


It’s Friday night, and you’ve just been invited to a Saturday event where you need to look your best. You don’t have time to schedule a manicure on such short notice, nor do you necessarily have the funds at the moment. So it’s going to be a DIY nails situation. Thankfully, there are some at-home options that can have your nails looking sharp in time for the event. But if you aren’t nail-savvy enough to undergo a full Shellac gel nail routine, and you aren’t a fan of the old-fashioned nail painting that could chip before you even arrive the next day, you might be questioning how to get your nails in tip-top shape in time. Enter: semi cured gel nails. A salon-grade gel style manicure that you can do by yourself, at home, without a degree from beauty school. The best part? They’ll last just as long as if you had paid for the appointment. Here’s everything you need to know about this trend that will save you money and time while giving you some of the best looking nails of your life – all the time.
Semi Cured Gel Nails vs. Regular Gel Nails
The answer to the perfect at-home manicure is here. Semi cured gel nails look,feel, and last like gel nails – but require half the work and just about none of the skill. All gel nails, including semi cured gel nails, require a curing process in which you put your nails under a UV light that makes them hard to the touch. But classic gel nails, the most common being Shellac gel nails, require several layers of painting, each one followed by some time under UV light to cure that layer. In contrast, semi cured gel nails eliminate those first steps. Instead of painting your nails in various layers, you simply apply a nail strip and shape it to your nail, then you cure it. Easier process, same result.
Items Needed To Apply Semi Cured Gel Nails at Home
There are really only two required items to apply semi cured gel nails at home: the semi cured gel nail strips, and the gel lamp. These two items are what make the magic happen. Most people, however, use items like a nail file and nail clippers to shape the nail and to apply the strip. And it’s important to have means to wash your hands and nails before you get started.
How Do They Work?
Perhaps the best thing about semi cured nails is that they’re hard to mess up. In a few simple steps, you’ll have salon-grade nails that everybody will be complementing. Here’s how it’s done.
- Wash your hands. Start with giving them a scrub, including your nails and nail beds. Most semi cured gel nail kits come with a prep pad that helps you scrub away oil and any other moisture from the surface of the nail itself. You’ll want to start with a clean slate to ensure the nail strip sticks on.
- Cut and shape your nails. If you haven’t already, you’ll want to make sure your nails are cut to the shape you want for them once they’re “painted.” The next step explains why.
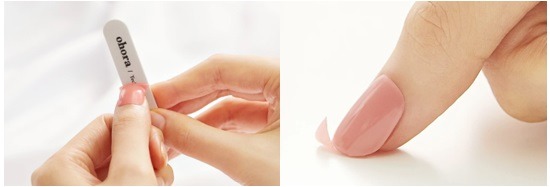
- Apply the nail strips. The individual strips on your sheet of nail strips may have slightly different shapes and sizes to fit varying nail sizes. Select the one that best fits the nail you’re applying it to and peel if off the sheet. The sheet will have markings that tell you which end of the strip is which (i.e., which end is facing your cuticle and which end is out in open air). When you apply the strip to your nail, you’ll want to leave a small space at the bottom before it reaches your cuticle. Then, you’ll simply press and smooth it onto your nail.
- Remove excess strip. Some kits provide a nail file for this step, but there are a few ways you can do it. If you file it off, make sure to do it in one direction so as to not damage the remaining strip that is on your nail. Otherwise, you can clip it off with nail clippers, rub it off on a hard surface (it comes off fairly easily), or simply tear it off with your hand. Regardless, though, you’ll likely want to use that nail file once the excess strip is off to shape what’s left.
- It’s now time to bring these nails from semi cured to cured using your UV lamp. Using the instructions provided with the lamp, you simply place your hands under the lamp for the necessary duration until the gel is hardened. Thicker strips or strips with decals take a little longer, or may need to be cured twice or three times. If it’s cured completely, it’ll be noticeably hardened and sealed in its place.
- Give them the once-over. The final step is simply to make sure your nails look the way you want them to. You may want to file them down one last time here, but otherwise, it’s time to go show them off.
Why Opt For Semi Cured Gel Nails?
There are a million reasons why semi cured gel nails are saving lives all over the world. Not literally, of course. But the trend is taking off, and it’s not for nothing. First of all, semi cured gel nails save you the hassle of booking a nail appointment at your favorite salon, or any salon, especially if it’s on short notice. It’s not always easy to find a spot around your schedule to get your nails done, and it can be a time-consuming process. Semi cured gel nails are no-fuss, quick to apply, and will have your nails looking better than ever in the time it might take you just to drive to your appointment. They’re also perfect for those of us who aren’t the best at painting between the lines. Because they come in pre-made semi cured strips, you don’t have to do any painting at all, saving you the hassle of cleaning around your nails afterwards. And speaking of the post-painting, there’s not much of a dry time. Once the nails are hardened under the UV light, they’re done. No need to feel like you can’t touch anything for hours, and you don’t have to worry about messing up your nails before they get to make their debut. From saving you a manicure that could cost up to $100, to the cheap price of a nail strip (usually under $20 for enough nail strips to last you over a month), to the easy application and clean up, there’s no reason you should have to worry about having flawless looking nails again.