
Sometimes, remodeling and redecorating is hard to do if you’re on a tight budget. But, if you think green, it can ease your way in the decorating game. When you think green, you will never miss a chance to recycle. Instead of throwing out your used stuff, reuse them and repurpose into unique and easy-to-make decorations for your home:
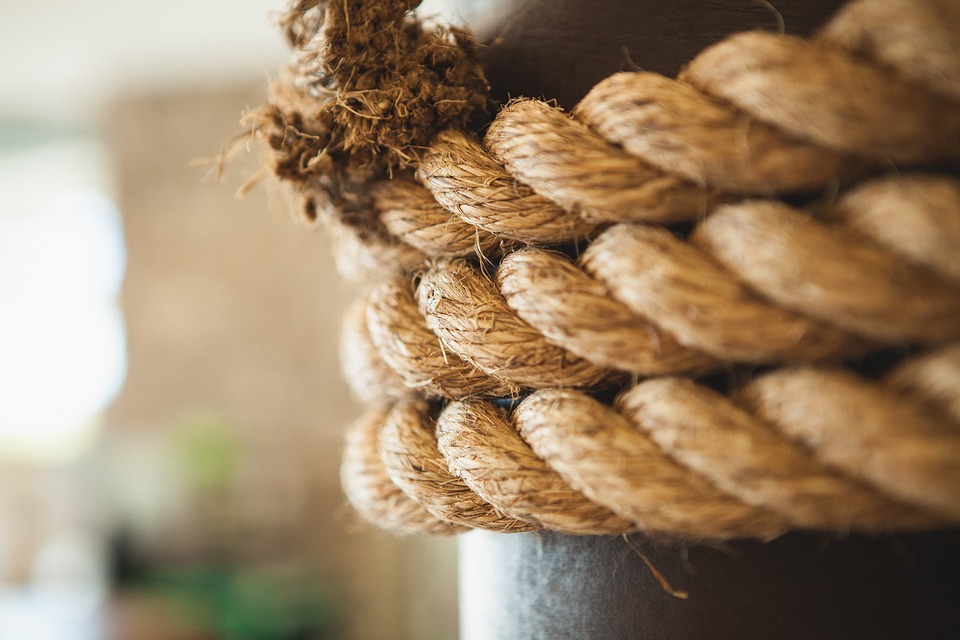
Turn a tire into a rope ottoman.
If you struggle with recycling old tires, here’s a great idea: turn it into an eco-friendly yet chic ottoman. Wrapping it in sisal rope adds a touch of texture that will suit a lot of different design styles.
Procedure:
- Gather a used tire (make sure it’s clean!), 6mm MDF cut into two circles with 55 cm diameter, thick natural sisal rope, screws, hot glue, glue gun, scissors, and a concentrated sealer.
- Place one MDF on one side of the tire and drill three holes on the edge. Make sure the holes are of equal distance with each other, and that it’s deep enough to pierce the rubber. Screw them tightly using a screwdriver. Repeat this on the other side of the tire.
- Using the hot glue and the glue gun, start gluing sisal rope at the center of the circle. Press the tip of the rope to stick well and go spiral, just like the shape of the snail. Put enough glue before gluing another round. Keep the spiral tight and firm.
- Once you have reached the end of the board, make sure the end of the sisal meets the beginning of the one on the edge. Turn the tire upside down.
- Continue covering the tire with the rope until you reach the end of the tire. After covering all the rubber, cut the rope and glue the ends properly. You don’t need to put sisal on the bottom MDF since it will be lying on the floor.
- Apply the concentrated sealer to the sisal surface using a brush. Put one coat and apply another after one hour. The sealer will be dry after a day but wait for two weeks before use for complete drying.
Create a wall art out of sacks.
The muslin sacks used to contain your flour, sugar or animal feeds can make vintage-looking wall art. This looks great especially for rustic or industrial-styled houses, or when put above distressed furniture.
Procedure:
- Get some sacks, canvas boards, double-sided carpet tape, and your embroidery kit.
- Open the sack along the seams to make it a flat piece of fabric. Hand wash it to clean, let it dry and press with an iron.
- The printed label might be faded, so you may embroider the words, the images, and logo. Match the thread to the original colors printed.
- Place the fabric against a canvas board. Make sure the board has a size just enough to allow two inches of the fabric to be wrapped around all sides to the back of the board.
- Attach the fabric to the board using double-sided carpet tape. Apply the tape to the sides and the back edges of the canvas.
- Tightly wrap the fabric around the board while pressing it firmly to the tape. Cut off any excess fabric along the back.
- Attach hanging hardware to the back of the board if you would like to hang it on the wall.
Use old bowls for your new pendant lamp.
Take on a new style for your kitchen or dining area by using pendant lamps out of your old ceramic bowls. Make a statement and wow your guests with your amazing lampshade.
Procedure:
- Get some bowls that measure at least five inches in diameter and four inches high, a power drill (or a ceramic hole saw) and a pendant light kit.
- If you would like to add some oomph to the bowls, go paint it with the colors and designs you like. Better to match it with your existing interior color scheme and make it an accent piece.
- After the paint has dried, turn the bowl upside down on a flat surface. Measure and mark the center of the bowl at the bottom.
- Use a power drill or a ceramic hole saw, push down the center of the mark until you make a hole through the bottom of the bowl. Before you do this, put on a dust mask and protect your eyes with safety goggles.
- Wipe off the debris from making a hole, then screw the socket from the pendant light kit into the hole.
- Install a bulb compatible with the light kit and hang it according to the instructions provided.
Create a vase out of plastic spoons.
Don’t throw out your takeout spoons. Think green! Keep them and wash them like you wash your regular spoons. Store them, and when you had enough, try to do this cool DIY vase. In this idea, you will create a blue ombre vase – blue to complement any color of the flowers you will put in the vase, and ombre for a stylish effect.
Procedure:
- Gather plastic spoons, a large can, paper plate, paintbrush, white spray primer, blue acrylic paint, white acrylic paint, glue gun, scissors, and paint brushes.
- Using the spray primer, paint the exterior of the can.
- Cut the handles off the spoons. Discard most of the handles, but leave a few for later use. Estimate how many rows of spoons you need to cover the entire can, as well as how many spoons per row.
- Use the paper plate as your paint palette. Pour out one tablespoon of blue paint for every row of spoons you need to paint. Pour it as blobs, like in a palette. Leave the first blob as it is, and add ½ teaspoon of white paint to the second blob, then 1 teaspoon of white to the third blob. Continue adding ½ teaspoon of white for every next blob – most probably you will cover four to five rows.
- Using the handles previously cut off from the spoons, blend the mixtures.
- Paint one row of spoons in each color you prepared. You only need to paint the backs of the spoons, as this will be the visible side. Let dry.
- Apply hot glue to the outer rim of each spoon. Start with the spoons with the lightest color and glue them around the top edge of the can. Make sure that the spoon extends above the lip of the can.
- Glue the second row of spoons, using the second-lightest color, and place them in between the previous row so that the spaces where the can is seen would be covered. Continue adding rows in that manner, until you reach the bottom row with spoons of your original blue color.
Make a floral lamp using egg cartons.

If you have been baking a lot, most probably you have a lot of cardboard egg cartons that go to waste. Some of them get reused, but most get stuck up on your trash. Why not make something out of it, like a floral lamp?
Procedure:
- Get 9 dozen-size cardboard egg cartons, string lights with 100 LED bulbs, 10” x 20” chicken wire, floral wire, spray paint, cutter, and scissors.
- Cut out individual cups from the egg cartons. Trim the edges so it would look like four rounded petals.
- With your color of choice, spray-paint the inside and outside of cups. Make them look like flowers. Let dry.
- Get your chicken wire and push an LED bulb through each hole. Keep them in place with floral wire.
- Roll the chicken wire into a cylinder, with the front side of the bulbs out. Fasten the ends of the chicken wire together with the floral wire. Keep aside.
- Cut an X on the bottom of each egg carton cup using the cutter. Push a cup over each lightbulb until you have completely covered the wires.
- Place it on a tabletop where you would like to put it and light up the string lights. Enjoy your creation!
Create a candle holder out of tuna cans and clothespins.
Here’s a decorative detail that will surely fit in any room. It’s super easy to do, yet it gives an authentic effect. The wooden clothespins give a naturally elegant look to this decorative piece.
Procedure:
- Get long wooden clothespins, a can of tuna (wide and short), and small candles or LED votives.
- Thoroughly clean the tuna can and remove the label.
- Attach the clothes pegs around the edge of the can until the can is completely covered. Repeat it with other cans.
- Place the candle inside when ready.
- You may also make this as a small plant pot. Just add holes at the bottom first. Add soil and plant. Then voila, you can have mini pots for your balcony or porch.
Hang a photo mosaic using CD cases as a canvas.
Make a cool wall décor using your old CD cases. CDs are getting phased out now in this digital and Internet age, and many homeowners are tossing them in the trash or hiding them in their attics and garages when redecorating the home. Reuse them as “canvas” for a photo mosaic that will make a great accent on the wall.
Procedure:
- Gather 20 CD cases, Velcro tape, twenty 5” x 7” photo paper sheets, a digital copy of your chosen photo, a computer and a printer.
- Using a photo-editing program like Adobe Photoshop, open your chosen high-resolution photo on your computer. Resize the photo to 26 ½” x 18 ¼“. Divide the image into twenty 5 3/8” x 4 5/8” rectangles using the selection tool. Cut and paste each rectangle into a separate 5 3/8” x 4 5/8” photo files.
- Print out each file into the photo paper. Cut off the excess white spaces.
- Remove the interior sections and paper inserts from your CD cases.
- Trace one photo segment into a thin piece of cardboard and cut. Repeat it 19 times for every photo segment.
- Using double-sided tape, attach a piece of cardboard to the back of every photo segments.
- Slip each segment, right side up, into a CD case and close. Repeat this step until every photo segments are placed inside a CD case.
- Using Velcro tape, attach the cases to the wall one at a time. Place it on the wall like a puzzle – with every piece lying in the right order to form one large photo. Allot a small space so the cases almost touch.